From IDE to binary: writing Go in InteliJ
Getting the plug-in right, and living in the IDE. This was written before Goland came out, but here for posterity.
In my experience, Golang is a really easy language to get started in. Install Go, write main.go, go run main.go. But developing in Golang has its share of challenges as well, like IDEs, build scripts, and testing. Fortunately, the Golang community has built a lot of cool tools in the past couple of years; everything from custom IDEs, to dependency management tools. I’m going to write a bit about how I’ve found it useful to write, test, and build Go code.
You can checkout the repo for this post at github.com/vogtb/writing-gocode.
InteliJ Setup
If you’re writing Go, chances are that it’s not your first language. Maybe you’re a Python person, or a Java enthusiast. But if you’re moving to Go from a language that has a great IDE, the experience can be a little jarring. Over the last couple of years, the Go community has built a couple of IDEs specifically for Go, and best of all, an InteliJ plugin for Go!
To get started, find the Golang plug-in and install it. You’ll find it in Preferences > Plugins > Brows Repositories… > “Go”, Getting the plug-in installed is the easy part. Now, since Golang expects that you write Go code in your $GOPATH path, you need to configure your IDE to recognize remote (from github, for example) and local (libs/logger, for example) dependencies.
Here’s the directory structure of the example Go repo I’ll be using in this post:
~/dev/writing_repos/writing-gocode/
  tools/
    .go/
      bin/
      pkg/
      src/
        github.com/
          gorilla/
    pkg/
    src/
    	apps/
    	  myapp/
    	    main.go
    	libs/
    	  logger/
    	    logger.go
          logger_test.go
    target/
    Makefile
The Makefile is configured such that when you run `make deps` it will point GOPATH to tools/.go, and install all dependencies in the src directory. In order for InteliJ to recognize the specific versions we’ve installed, we need to set a custom GOPATH. We can do that by going to Preferences > Languages & Frameworks > Go > Go Libraries. Your global libraries should point to where you have your existing GOPATH set to (for example, mine is `/Users/bvogt/go`). Under Project Libraries, you should add the .go directory in this go repo (/Users/bvogt/dev/writing_repos/writing-gocode/tools/.go), as well as the lib path (/Users/bvogt/dev/writing_repos/writing-gocode/tools). The first is so InteliJ recognizes your remote dependencies, and the second is so InteliJ recognizes your local libraries.
Now InteliJ will auto-complete our imports!
Testing
While we probably want to run unit tests on our libraries and applications in some sort of automated framework, it’s useful to be able run them as a whole inside the IDE. To setup your tests go to Run > Edit Configurations. Then click the + icon to add a Go Test configuration. Give it an appropriate name, something like “go test all”, and select “gotest” as the framework, “Directory” as the kind of test, and your Go src file (/Users/bvogt/dev/writing_repos/writing-gocode/tools/src) as the directory. You’ll also need to specify your repo directory as the “Working Directory.” Your settings should look something like this:
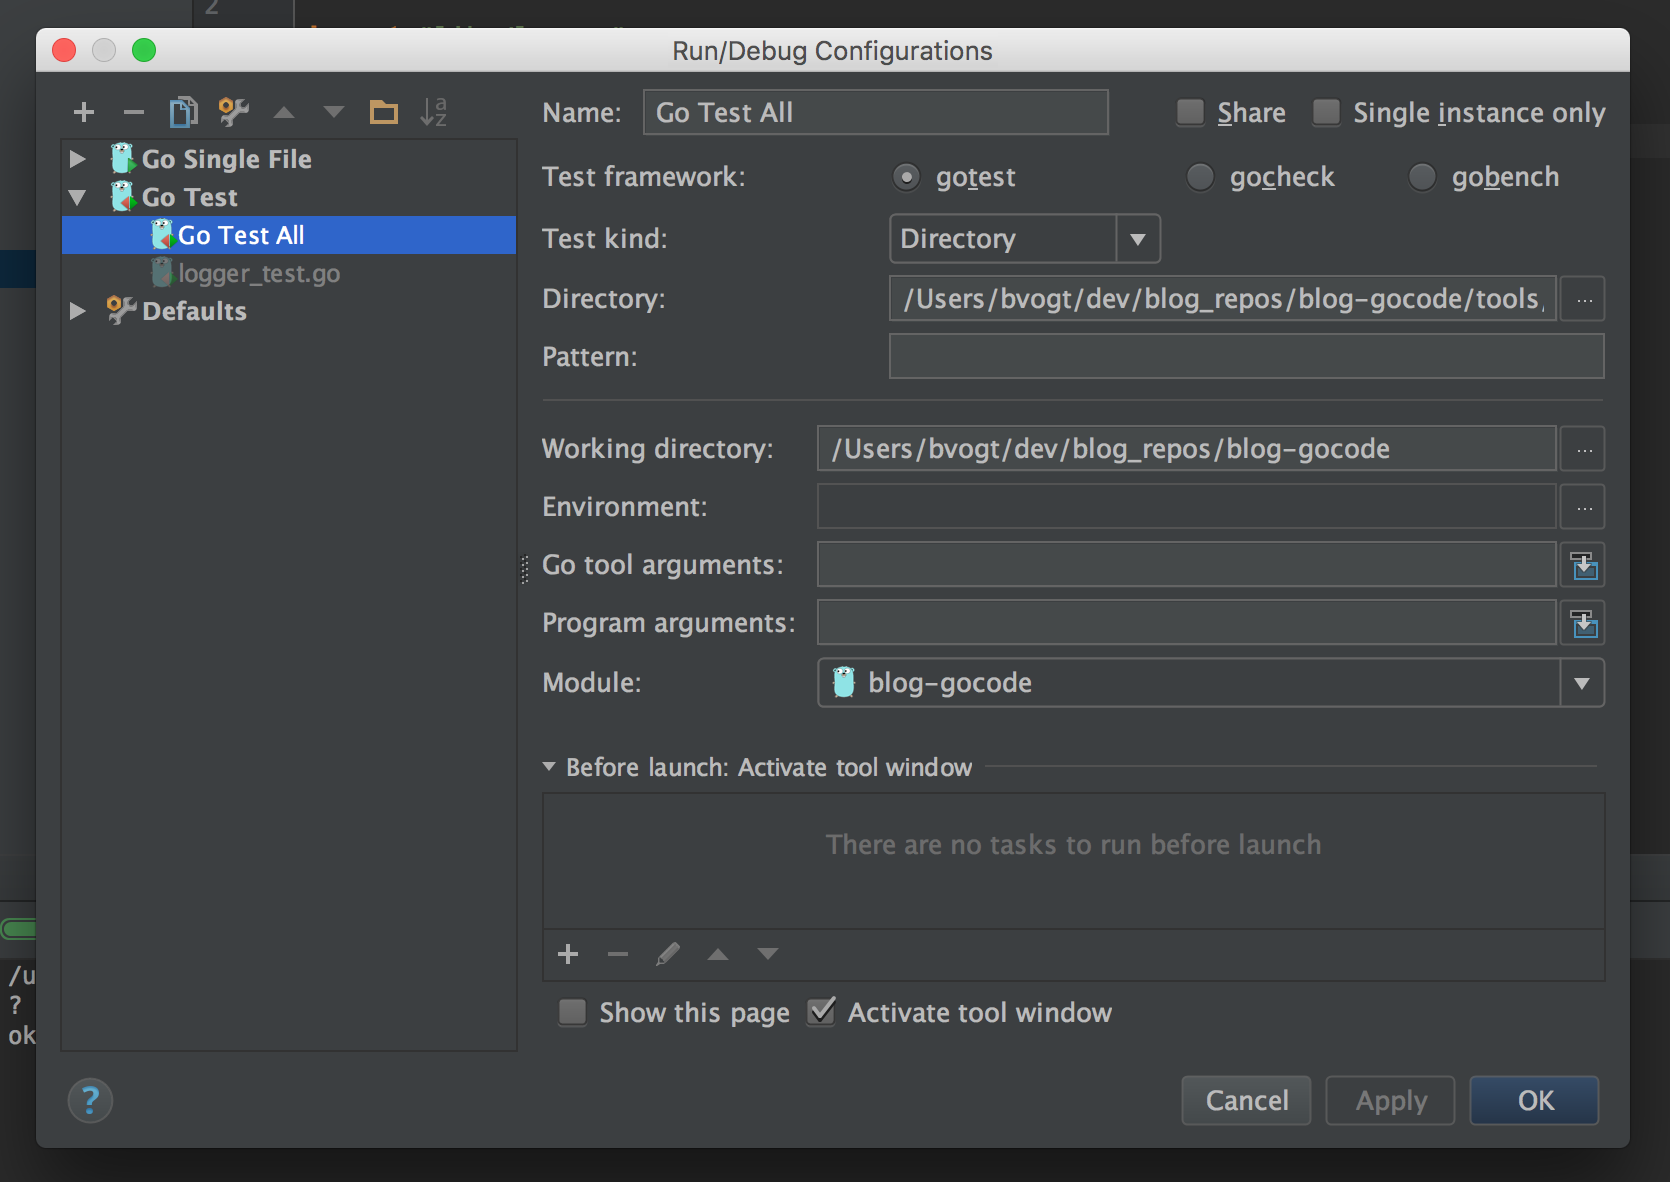 InteliJ configuration for running all tests in repo.
You should now be able to click on an entire directory and select “Run Tests”, or you can select a single test function to run individually.
Formatting
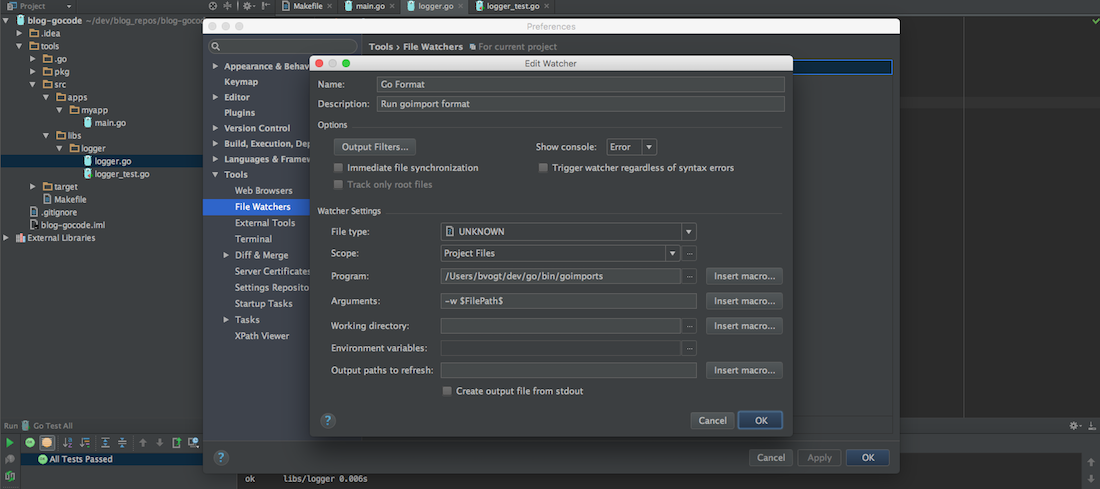
InteliJ makes it easy to set your editor to auto-indent and auto-import, but I’ve found that it is far easier to tell Go to format the files itself when you save them. This is where a useful tool called File Watcher comes in. You can install it by going to Preferences > Plugins > Browse Repositories… > “File Watcher”.
To configure a new watcher, go to Preferences > Tools > File Watcher > “+” and configure it with the following parameters:
- Name: “Go Format”
- Description: “Run goimport format”
- Un-check “Immediate file synchronization” If you don’t un-check this, every time you synchronize it will run, and throw warning.
- File type: “Go”
- Scope: Program Files
- Program: “/Users/bvogt/dev/go/bin/goimports” (assuming you’ve installed goimports)
- Arguments: “-w $FilePath$”
Whenever you explicitly save the file (Cmd + S, or Ctrl + S), the watcher will format your files. You’ll notice that it will also organize your imports into a specific order. I’d hazard a guess that as Golang is more widely adopted, we’ll see some first class support for things like code organization, but for now a simple file watcher works pretty well.
Building with Makefile
Makefiles have been around for literally decades. They’ve also gotten a bad rap as being difficult to manage, and confusing, but if you use them properly, and understand them, they’re pretty powerful tools. The simplest Makefile for building an app in our go repo looks like this:
PWD := $(shell pwd)

OS := linux
ARCH := amd64
LDFLAGS := -X main.build=master

GOPATH := $(PWD)/.go:$(PWD)
GOENV := GOPATH=$(GOPATH)
GO := /usr/local/go/bin/go
GOBUILD := $(GOENV) GOOS=$(OS) GOARCH=$(ARCH) $(GO) build -i
GOIMPORTS := $(GOENV) PATH=$(PWD)/.go/bin goimports -w

DEPS := $(shell $(GOENV) $(GO) list -f '{{range .Imports}}{{.}} {{end}}' ./... | tr -s ' ' "\n" | grep -v "^libs" | sort | uniq)

SRC_DIR := ./src
TARGET_DIR := ./target


# common
.PHONY: .go deps fmt

.go:
	@echo "# Setting project GOPATH"
	mkdir -p $(PWD)/.go/bin $(PWD)/.go/pkg $(PWD)/.go/bin/src

deps: .go
	@echo "# Installing dependencies"
	@echo $(DEPS)
	@echo $(DEPS) | $(GOENV) xargs -n1 $(GO) get -d
	mkdir -p $(TARGET_DIR)


fmt: .go
	@echo "# Formatting the code"
	gofmt -w .

# commands
APPLICATIONS= myapp

.PHONY: $(APPLICATIONS)
$(APPLICATIONS): deps fmt
	@echo "# Building $@"
	$(GOBUILD) \
		-ldflags "$(LDFLAGS)" \
		-o $(TARGET_DIR)/$@.$(OS).$(ARCH) \
		apps/$@

# distribution

.PHONY: dist

dist:
	rm -fr $(TARGET_DIR)/*
	rm -fr $(PWD)/.go
	rm -fr $(PWD)/pkg/$(OS)_$(ARCH)*
This allows us to set our own GOPATH that is specific to this project, so when we build our binary we can include libraries from github and libraries that are inside this repo. You can now build a runnable Go binary like this:
13:59 ~/dev/writing_repos/writing-gocode/tools (master) $ make myapp OS=darwin
# Setting project GOPATH
mkdir -p /Users/bvogt/dev/writing_repos/writing-gocode/tools/.go/bin /Users/bvogt/dev/writing_repos/writing-gocode/tools/.go/pkg /Users/bvogt/dev/writing_repos/writing-gocode/tools/.go/bin/src
# Installing dependencies
log
mkdir -p ./target
# Formatting the code
gofmt -w .
# Building myapp
GOPATH=/Users/bvogt/dev/writing_repos/writing-gocode/tools/.go:/Users/bvogt/dev/writing_repos/writing-gocode/tools GOOS=darwin GOARCH=amd64 /usr/local/go/bin/go build -i \
		-ldflags "-X main.build=master" \
		-o ./target/myapp.darwin.amd64 \
		apps/myapp
13:59 ~/dev/writing_repos/writing-gocode/tools (master) $ ./target/myapp.darwin.amd64
2016/11/05 13:59:45 INFO: Hello!
That’s it! In addition to having an IDE setup that can auto-import, auto-format, you can also build Go binaries with a Makefile. If you want to take a look at the code for this blog post, you can check it out on github at github.com/vogtb/writing-gocode.