Cloud architecture with packer, terraform, nomad, and consul
When thinking about cloud providers, containers, and cloud architecture it's easy to want to find a silver bullet. But if you step back from the problem, you can use a set of OSS tools, services, and frameworks to make your services more manageable, and make changing and comparing providers easier.
Resources for this blog post can be found here: https://github.com/vogtb/writing-packer-terraform-nomad-consul.
If you read any software development forum for any amount of time, you’ll eventually get caught up reading a debate about which containerization platform to use. Do you use K8 on GC, or use AWS Compute, or Docker? Or maybe you just buy large, on-demand instances from your provider, and run the containerization management software yourself. I really think that a lot of these debates are missing the point. The point of containerization is not to solve all your problems for you, but to give you the scaffolding to help you solve your problems. By using containerization you’re not going to reduce the number of concerns you have, but you’re going to make those concerns manageable. I’m here to argue that if you step back from the problem, you can use a set of OSS tools, services, and frameworks to make your services more manageable, and make changing and comparing providers easier.
Using the tools listed below, you can develop, build, test, deploy, and monitor software in a way that is largely agnostic to your cloud provider. You can even take advantage of multiple containerization platforms. To demonstrate this is easier than you think, I’d like to walk through an example infrastructure setup.
Overview
- Packer - Creating and provisioning machine images.
- Terraform - Planning, building and changing infrastructure.
- Nomad - Managing machines and stopping, starting, deploying, and controlling applications on them.
- Consul - Service discovery, so applications can dynamically route messages amongst themselves.
In this example, we’ll be building a simple system to power a webpage. We’ll have a frontserve service that serves up a web page, and a backserve service that provides data to populate the web page.
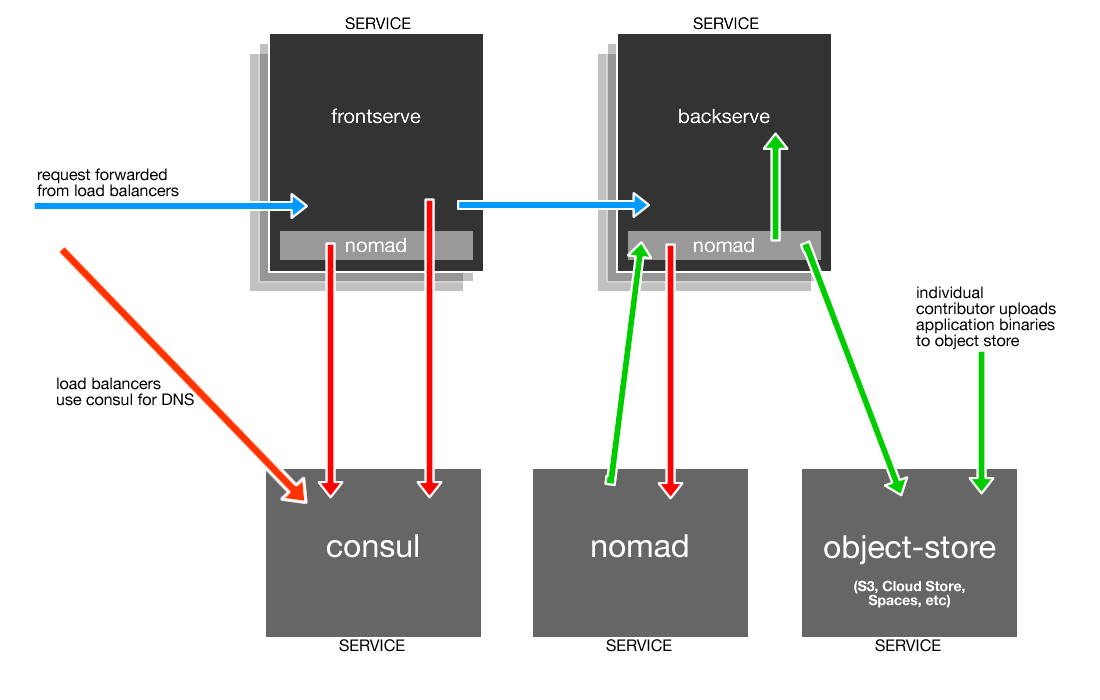
RED LINE Service Discovery
Ongoing, maintenance-less, but can trigger contributor intervention.
Basically DNS. Consul can be used for service discovery through DNS service-queries.
BLUE LINE Inbound Request Flow
Triggered from outside world, external events, time, etc.
When a request comes in it goes from the load-balancers to frontserve, we use Consul’s DNS resolution to find the backserve service that will field the downstream request.
GREEN LINE Developer Deployment
I.E. “Contributor Intervention.” Could be a code push, deploy, configuration change, etc.
Deploying new versions of an application is done using Nomad. The Nomad client-agents run in a side-car configuration on all service instances, and allows us to send tasks to those instances from the main Nomad cluster. When a developer is ready to deploy a new version of an application, they upload it to the object-store (bottom right) and run a Nomad job that will tell all instances to pull down the new binaries, and run them.
Packer
Provisioning servers through a cloud provider can be a time consuming and manual process. With packer, however, you can automate this process, creating dependable, reproducible machine images. You can take a base machine image, add users, services, tools, packages, and even configuration, so when it comes time to create an instance with your cloud provider, you can start the instance with almost everything it needs to be useful.
Let’s do that with packer. For this example, we’ll be building a virtualbox-iso image.
{
  "variables": {
    "hostname": "test-packer"
  },
  "builders": [
    {
      "headless": true,
      "type": "virtualbox-iso",
      "guest_os_type": "Ubuntu_64",
      "iso_url": "http://releases.ubuntu.com/12.04/ubuntu-12.04.5-server-amd64.iso",
      "iso_checksum": "769474248a3897f4865817446f9a4a53",
      "iso_checksum_type": "md5",
      "vm_name": "{{ user `hostname` }}",
      "ssh_username": "super",
      "ssh_password": "super",
      "shutdown_command": "echo super | sudo -S shutdown -P now",
      "http_directory": ".",
      "boot_wait": "10s",
      "boot_command" : [
        "<esc><esc><enter><wait>",
        "/install/vmlinuz noapic ",
        "preseed/url=http://{{ .HTTPIP }}:{{ .HTTPPort }}/preseed.cfg ",
        "debian-installer=en_US auto locale=en_US kbd-chooser/method=us ",
        "hostname={{user `hostname`}} ",
        "fb=false debconf/frontend=noninteractive ",
        "keyboard-configuration/modelcode=SKIP keyboard-configuration/layout=USA ",
        "keyboard-configuration/variant=USA console-setup/ask_detect=false ",
        "initrd=/install/initrd.gz -- <enter>"
      ]
    }
  ],
  "provisioners": [
    {
      "type": "shell",
      "pause_before": "5s",
      "inline": [
        "echo 'Done with inline shell provisioning'"
      ]
    }
  ]
}
If we ran packer against this config we would build a virtualbox image. But if we want to create an instance with our cloud provider, in this case Digital Ocean, all we have to do is change the builder part of the config, and the provisioner will still work. The benefit of this is that contributors can rehearse their changes with a local builder before spending money through a cloud provider.
Let’s change our provisioners to install some necessary software; consul, and nomad.
{
  "variables": {...},
  "builders": [...],
  "provisioners": [
    {
      "type": "shell",
      "pause_before": "30s",
      "inline": [
        "sleep 30",
        "sudo apt install unzip",
        "curl -LOk https://releases.hashicorp.com/consul/1.0.2/consul_1.0.2_linux_amd64.zip && unzip consul_1.0.2_linux_amd64.zip && sudo cp consul /usr/bin/consul",
        "consul --version",
        "curl -LOk https://releases.hashicorp.com/nomad/0.7.1/nomad_0.7.1_linux_amd64.zip && unzip nomad_0.7.1_linux_amd64.zip && sudo cp nomad /usr/bin/nomad",
        "nomad --version"
      ]
    },
    {...},
    {...}
  ]
}
With this configuration in place, we can verify that the configuration is okay by running packer validate, and packer build base.json to finally build the image.
$ packer build base.json
digitalocean output will be in this color.
==> digitalocean: Creating temporary ssh key for Droplet...
==> digitalocean: Creating Droplet...
==> digitalocean: Waiting for Droplet to become active...
==> digitalocean: Waiting for SSH to become available...
==> digitalocean: Connected to SSH!
...
...details omitted for brevity...
...
==> digitalocean: Gracefully shutting down Droplet...
==> digitalocean: Creating snapshot: base.2017.12.23.8
==> digitalocean: Waiting for snapshot to complete...
==> digitalocean: Destroying droplet...
==> digitalocean: Deleting temporary ssh key...
Build 'digitalocean' finished.
Now that we have a machine image, we can use it to create instances that are more complete, and take less time to become useful.
Terraform
Packer allows us to build and provision machine images, but does not not allow us create instances. But Terraform does. It allows developers to codify their infrastructure, and build and change it as if it were code. Here’s the quickest example of how powerful Terraform is:
provider "digitalocean" {
 token = "API_TOKEN_OMITTED"
}
data "digitalocean_image" "base-image" {
 name = "base.2017.12.23.7"
}
resource "digitalocean_droplet" "prime01nyc3" {
 image = "${data.digitalocean_image.base-image.image}"
 name = "prime01nyc3"
 region = "nyc3"
 size = "512mb"
}
By running terraform plan we can see that this will create an instance on Digital Ocean, and by running terraform apply we can put the plan in action and build machine instances. You can see that we’re even using the “base.2017.12.23.7” base image that we created with packer. When we run the apply command, our instance is built and comes up really quickly.
$ terraform apply
data.digitalocean_image.base-image: Refreshing state...
digitalocean_droplet.prime01nyc3: Refreshing state... (ID: 76208138)
An execution plan has been generated and is shown below.
Resource actions are indicated with the following symbols:
 + create
Terraform will perform the following actions:
 + digitalocean_droplet.prime01nyc3
 id: <computed>
 disk: <computed>
 image: "30346200"
 ipv4_address: <computed>
 ipv4_address_private: <computed>
 ipv6_address: <computed>
 ipv6_address_private: <computed>
 locked: <computed>
 name: "prime01nyc3"
 price_hourly: <computed>
 price_monthly: <computed>
 region: "nyc3"
 resize_disk: "true"
 size: "512mb"
 status: <computed>
 vcpus: <computed>
Plan: 1 to add, 0 to change, 0 to destroy.
Do you want to perform these actions?
 Terraform will perform the actions described above.
 Only 'yes' will be accepted to approve.
 Enter a value: yes
digitalocean_droplet.prime01nyc3: Creating...
 disk: "" => "<computed>"
 image: "" => "30346200"
 ipv4_address: "" => "<computed>"
 ipv4_address_private: "" => "<computed>"
 ipv6_address: "" => "<computed>"
 ipv6_address_private: "" => "<computed>"
 locked: "" => "<computed>"
 name: "" => "prime01pd1"
 price_hourly: "" => "<computed>"
 price_monthly: "" => "<computed>"
 region: "" => "nyc3"
 resize_disk: "" => "true"
 size: "" => "512mb"
 status: "" => "<computed>"
 vcpus: "" => "<computed>"
digitalocean_droplet.prime01nyc3: Still creating... (10s elapsed)
digitalocean_droplet.prime01nyc3: Still creating... (20s elapsed)
digitalocean_droplet.prime01nyc3: Still creating... (30s elapsed)
digitalocean_droplet.prime01nyc3: Creation complete after 34s (ID: 76314842)
Apply complete! Resources: 1 added, 0 changed, 0 destroyed.
The cool thing about using terraform and packer together is that this instance is fully running in just a few seconds! Since we’ve provisioned our machine when we created the image, we’ve elimiated the need to do it when we provision the instance!
Consul
Here’s where we start to do some interesting things that can be accomplished in a number of different ways by a number of different technologies; service discovery and load balancing.
If you have a group of servers that constitute a service, and they rely on another service, how do you configure one service to know where to reach the other service? You can do something like a load balancer, where service A talks to a load balancer, which knows about service B, and evenly distributes the load to all downstream instances. Or you could configure service A to talk directly to service B, so every instance of A knows about every instance of B. But then what happens when a server in B goes down? What if you’re running both services on instances that regularly go down? What happens when you have a thousand instances, and on any given day the odds of an instance going down are pretty solid? Using Consul and Nomad together helps mitigate all of these problems, and gives you a framework in which to think about the remaining issues.
By using Consul as service discover you can more dynamically define services, including health checks. This means when instances leave and join a service group, Consul can remove or add them to lists of healthy instances that should work on messages for a service.
When used with Consul, Nomad gives you one of the core features of a containerization framework; the dependability and composability of services and their contracts with each other.
With that in mind, let’s use Terraform to create a prime01nyc3 instance in a cloud environment. This is the instance that will host Nomad and Consul servers. In an actual production environment, running a single instance of either of these is dangerous, because given enough time, failure of those instances is certain. But for this example it’s fine.
data "digitalocean_image" "base-image" {
 name = "base.2017.12.23.8"
}
variable "region" { default = "nyc3" }
resource "digitalocean_droplet" "prime" {
 count = 1
 image = "${data.digitalocean_image.base-image.image}"
 name = "${format("%s%02d%s", "prime", count.index + 1, var.region)}"
 region = "${var.region}"
 size = "512mb"
}
We’re instructing Digital Ocean to create a single instance with the name “prime01nyc3” using the image that we build earlier with Packer. Once it’s up and running, we can add on to this configuration by telling DigitalOcean to create four more “worker” instances.
variable "region" { default = "nyc3" }
resource "digitalocean_droplet" "worker" {
 count = 4
 image = "${data.digitalocean_image.base-image.image}"
 name = "${format("%s%02d%s", "worker", count.index + 1, var.region)}"
 region = "${var.region}"
 size = "512mb"
}
When the instances come up, Nomad and Consul will be running on them, and nothing more. We can verify this by running the consul members command on the prime01nyc3 box.
NOTE: There’s some of custom configuration and tweaking that needs to take place for all of this to happen, and I’m skating over a lot of it. For configuration details checkout the accompanying github repo for this blog post.
root@prime01nyc3:~# consul members
Node Address Status Type Build Protocol DC Segment
prime01nyc3 165.227.211.183:8301 alive server 1.0.2 2 dc1 <all>
worker01nyc3 165.227.213.42:8301 alive client 1.0.2 2 dc1 <default>
worker02nyc3 165.227.209.14:8301 alive client 1.0.2 2 dc1 <default>
worker04nyc3 165.227.217.161:8301 alive client 1.0.2 2 dc1 <default>
worker03nyc3 165.227.213.11:8301 alive client 1.0.2 2 dc1 <default>
What’s even cooler is that consul gives us DNS resolution.
root@prime01nyc3:~# dig @127.0.0.1 -p 8600 worker01nyc3.node.consul
; <<>> DiG 9.9.5-3ubuntu0.16-Ubuntu <<>> @127.0.0.1 -p 8600 worker01nyc3.node.consul
; (1 server found)
;; global options: +cmd
;; Got answer:
;; ->>HEADER<<- opcode: QUERY, status: NOERROR, id: 25718
;; flags: qr aa rd; QUERY: 1, ANSWER: 1, AUTHORITY: 0, ADDITIONAL: 1
;; WARNING: recursion requested but not available
;; OPT PSEUDOSECTION:
; EDNS: version: 0, flags:; udp: 4096
;; QUESTION SECTION:
;worker01nyc3.node.consul.INA
;; ANSWER SECTION:
worker01nyc3.node.consul. 0INA165.227.217.161
;; Query time: 1 msec
;; SERVER: 127.0.0.1#8600(127.0.0.1)
;; WHEN: Mon Dec 25 20:22:30 UTC 2017
;; MSG SIZE rcvd: 73
Nomad
Nomad allows you to manage jobs running on clusters of machines. These jobs can be anything from short data-analysis scripts, to long running processes like stream processing applications. In this example, Nomad is going to be the tool that we use to deploy, stop, and start applications on our instances. While we can’t use Nomad to transfer the binaries that will run on the instances themselves, we can create Nomad jobs that will pull in the binaries from an external source and run them. In this example, we’ll be configuring a Nomad job to pull down our application binaries (frontserve.linux.amd64, and backserve.linux.amd64) from Digital Ocean’s storage service.
job "frontserve" {
 datacenters = ["dc1"]
 type = "service"
 update {
 max_parallel = 1
 health_check = "checks"
 min_healthy_time = "20s"
 healthy_deadline = "10m"
 auto_revert = true
 canary = 1
 stagger = "30s"
 }
 group "frontserve" {
 count = 2
 restart {
 attempts = 1
 delay = "10s"
 interval = "1m"
 mode = "fail"
 }
 ephemeral_disk {
 size = 300
 }
 task "start" {
 resources {
 cpu = 500
 memory = 100
 network {
 mbits = 100
 port "server" {}
 }
 }
 driver = "raw_exec"
 config {
 command = "frontserve.linux.amd64"
 }
 artifact = {
 source = "https://binaries.nyc3.digitaloceanspaces.com/frontserve.linux.amd64"
 }
 }
 }
}
For bootstrapping and configuration details see https://github.com/vogtb/writing-packer-terraform-nomad-consul.
This tells Nomad that our task is called “frontserve”, and that it’s an artifact we need to download. We can run this Nomad task by going to our Nomad server instance and running nomad run frontserve.nomad. Under the group stanza, you’ll see what we set the count to be 2, indicating we’ll need this service running on at least two machines. When we run this job, here’s what happens.
root@prime01nyc3:~# nomad run frontserve.nomad
==> Monitoring evaluation "32b6d2ea"
 Evaluation triggered by job "frontserve"
 Allocation "4c8b342a" created: node "0c25cfad", group "frontserve"
 Allocation "ea1c66ba" created: node "7d86c908", group "frontserve"
 Evaluation within deployment: "f0024d84"
 Allocation "4c8b342a" status changed: "pending" -> "running"
 Allocation "ea1c66ba" status changed: "pending" -> "running"
 Evaluation status changed: "pending" -> "complete"
==> Evaluation "32b6d2ea" finished with status "complete"
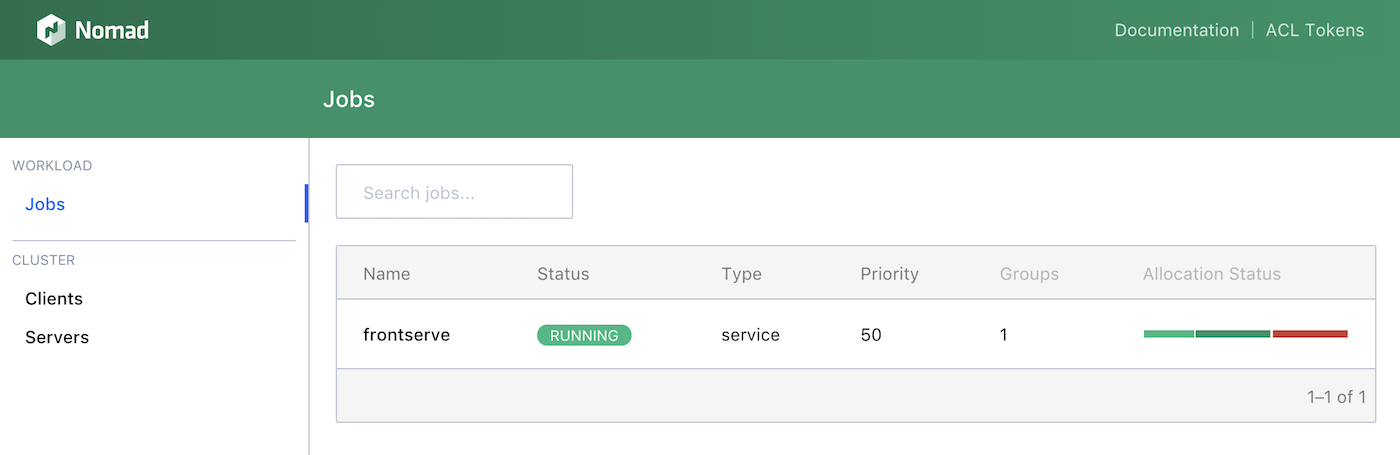
We now have the frontserve service running two of our nomad nodes! We can do the same thing with the backserve service. We could use the command-line to check the status of our services, nodes, and allocations, or we can check the Nomad UI.
All Together Now
Now that are services are running, if we check Consul, we should see that both frontserve, and backserve are services, and the instances are listed being apart of those services.
root@prime01nyc3:~# dig @127.0.0.1 -p 8600 frontserve.service.consul
...
;; ANSWER SECTION:
frontserve.service.consul. 0INA165.227.213.11
frontserve.service.consul. 0INA165.227.217.161
...
root@prime01nyc3:~# dig @127.0.0.1 -p 8600 backserve.service.consul
...
;; ANSWER SECTION:
backserve.service.consul. 0INA165.227.213.42
backserve.service.consul. 0INA165.227.209.14
...
(Details omitted.)
So if everything is configured properly, we have both of our services running, and it doesn’t matter where. Since Nomad jobs integrate with Consul, all we have to do is enable Consul to be our DNS* and we’ll be able to route requests through our system. I know that last sentance skipped neatly over a lot of difficult things, but it’s enough to say that there are a dozen ways to do it. Just imagine something along the lines of editing /etc/resolv.conf. for now.
Conclusion
There’s a lot that I didn’t cover here, like actually configuring DNS, using multiple cloud providers, security, LB routing, more realistic examples of applications. But the scaffolding is there to build those things! Beyond that, you get:
- The benefits of not being tied to a single provider, because of terraform.
- Not locked in to docker/kubernettes/whatever because your job system has been abstracted out from a single computation/containerization system.
- Giving yourself the flexibility to sample other providers or systems. Need custom instances from a provider? You can do that. Want to compare two containerization engines to see which one performs better? You can do that too!
- By codifying your infrastructure it’s easy to do multi-provider architectures.
- Infrastructure as code allows you to limit access to groups of machines.
- Streamlined platform for development, framework for monitoring.
- By ensuring your production scaffolding isolates your services and their responsibilities, developing apps becomes a matter of writing and testing code, rather than struggling with confiugration.
- Both Terraform and Nomad have the ability to be extended to do autoscaling!
None of these solve all your infrastructure issues, and there’s still a significant amount of work to get them into place, but their benefit doesn’t lie in any special technology, or fancy tool to solve all your problems. But they do give you a mental framework to manage your code and applications.